-
About Code Builder
This Microsoft Windows-based application was developed to aid in the management of the entire code build process from its initial compilation through deployment and notification.This project was constructed mostly in my spare time. It was based on a very crude version constructed years before my arrival to Parker. Aside from a very clumsy and difficult to use interface, its underlying structure was based on the SOAP protocol. Overtime I have converted it to use standard XML which makes it much easier to maintain as well as enable end-user's to have the ability to more easily read and/or modify it directly.
-
Main windowShown here is a typical main window displayed when the Code Builder application starts up: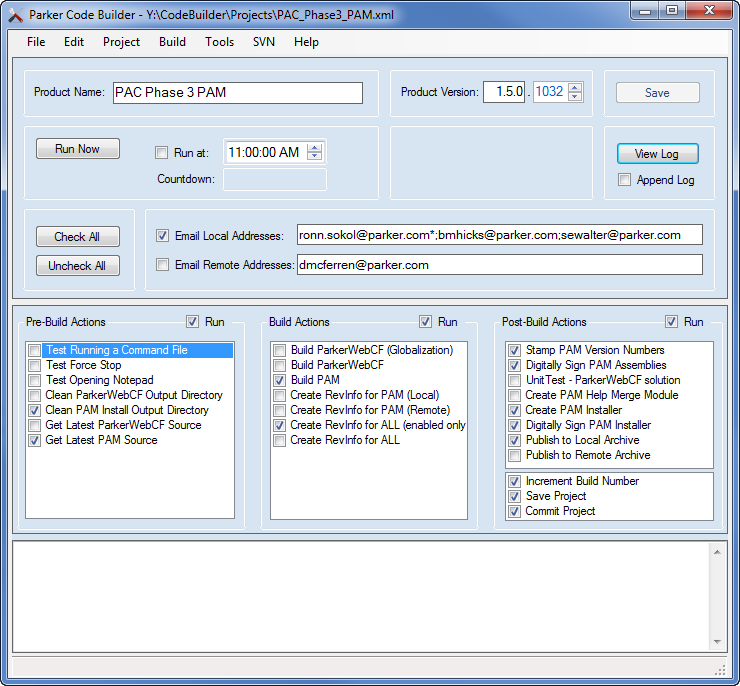
The first time the application is opened, the fields will contain default values.
From then on, whenever the application is opened, the most recent project file saved will be opened automatically. You'll see later in this document, that each project file is also automatically added to a most recently used menu.
The Code Builder application has a main menu bar containing File, Edit, Project, Build, Tools, SVN, and Help along with a full range of sub-menu items for each:The entire application window can be resized at any time. Similarly the ‘output field’ and simultaneously the ’actions area’ can be resized by clicking on the divider located in between the two areas and dragging it up or down. Double-clicking either of the dividers automatically sets it back to its default location which is roughly midway between the two panes.
A status bar located at the bottom of the application window is for notifying you of certain events that occur (such as when a project was saved, reverted, or in the process of being run). The message disappears automatically after a few seconds or when the mouse is moved a short distance around the screen:

-
File menuThis is the File menu: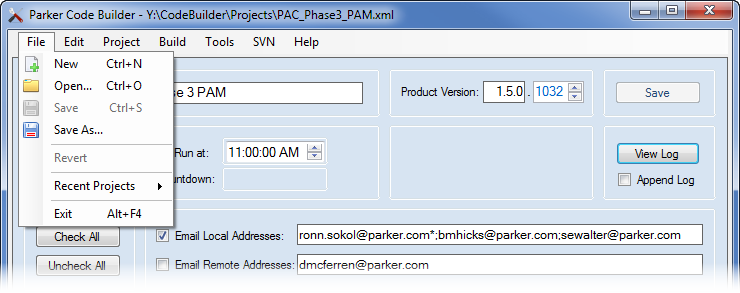 It provides commands to :Projects are by default, saved to, and retrieved from a pre-defined ‘Projects’ folder.
- Create a New project.
- Open an existing project.
- Save the current project.
- Save the current project using a new name and/or location.
- Revert any changes made to the current project since it was last saved.
- select a Recent opened project.
- Exit from the application.
-
Edit menuThis is the Edit menu: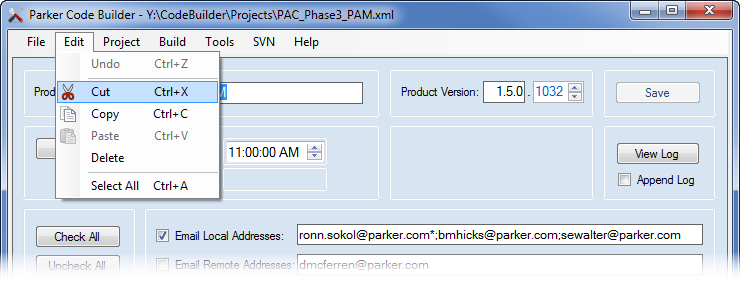 It provides commands to :
- Undo the last edit.
- Cut the selected text from the current textbox to the clipboard.
- Copy the selected text from the current textbox to the clipboard.
- Paste the text on the clipboard into the current textbox selection.
- Delete the selected text from the current textbox.
- Select all the text in the current textbox and highlight it.
All text fields located elsewhere on the window, also have available a right-click 'Edit' context menu :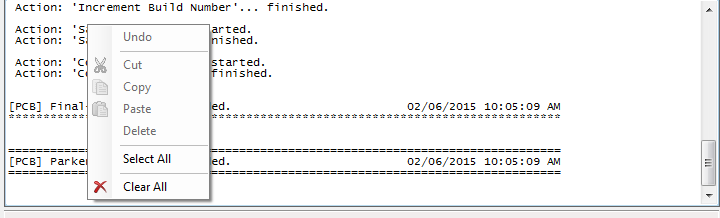
-
Project menuThis is the Project menu: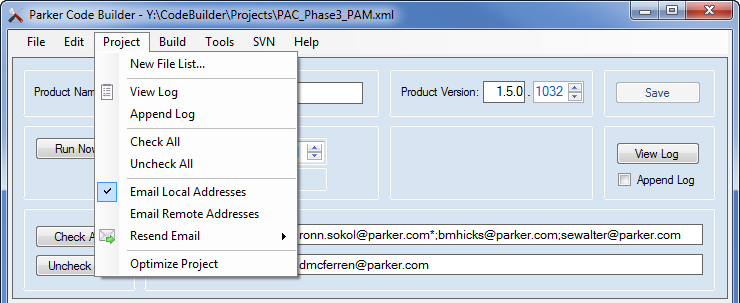 The 'Project' menu contains commands for working with project-specific items among them being:
- New FIle List... -
- View Log - performs the same function as when clicking the View Log button on the main window.
Clicking either the menu item or the button results in the current log file being opened using the default text editor.
For example :
- Append Log - performs the same function as when clicking the Append Log checkmark on the main window.. Unless this control contains a checkmark, the log file is automatically overwritten every time a 'Run' is performed
-
Build menuThis is the Build menu: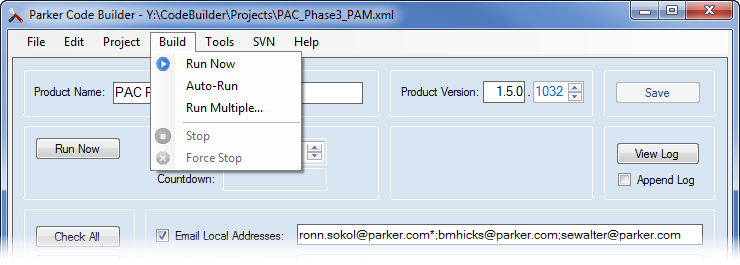 The Build menu provides the following commands:
- Run Now - runs the project immediately.
- Auto-Run - runs the project at a specified time.
- Run Multiple - runs multiple projects one after another (which at the present time has not been implemented).
- Stop - ends the run after the current action has finished.
- Force Stop - terminates the run immediately (which should only be used as a last resort).
-
Tools menuThis is the Tools menu: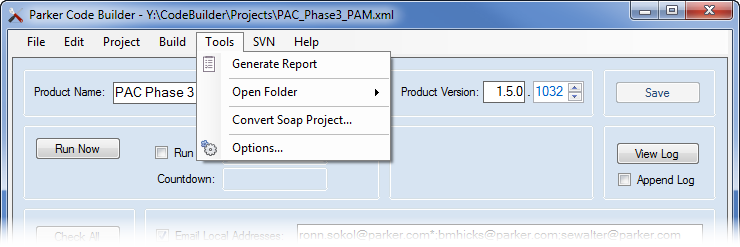 The Tools menu contains the following commands:
- Generate Report - displays an HTML Report consisting of all information related to the current project
-
SVN menuThis is the SVN menu: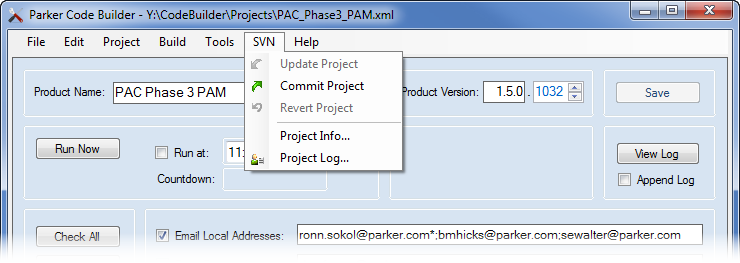
-
Help menuThis is the Help menu: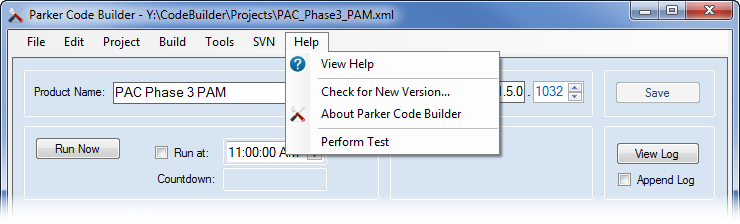 You can execute the following menu items:
- View Help - which essentially opens this help file.
- Check for a new version of this application.
- Show a help dialog with some minimal information about this application.
- Perform a Test which is mainly for debug purposes.
-
File | Recent Projects menu itemThe following shows a typical list of projects which were recently opened by the user. If a project is opened from a folder other than the default ‘Projects’ folder described above, the entire path is displayed. Note the current project’s filename is also displayed in the title bar. This information is particularly helpful when the application is minimized to the taskbar.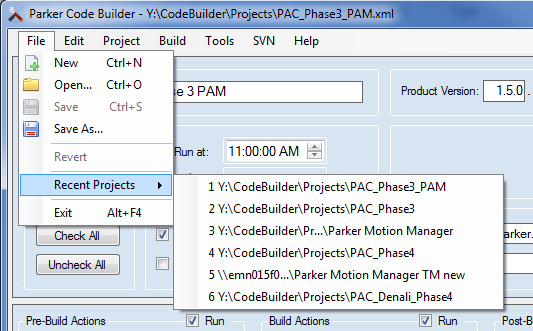
-
'Mouse Hover' example 1Shown here is the mouse being hovered over a window control - in this particular example - the Email Remote Addresses field: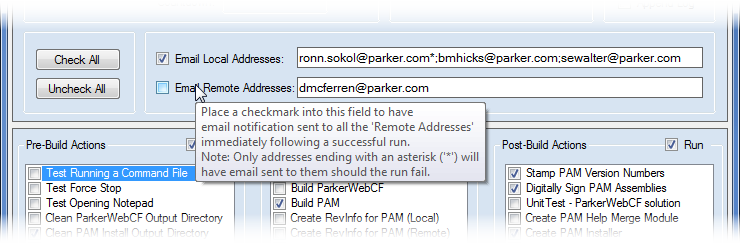 A tooltip describing the field is displayed temporarily...
 -
'Mouse Hover' example 2The following shows the mouse being hovered over an action - in this particular example - the Test Running a Command File action: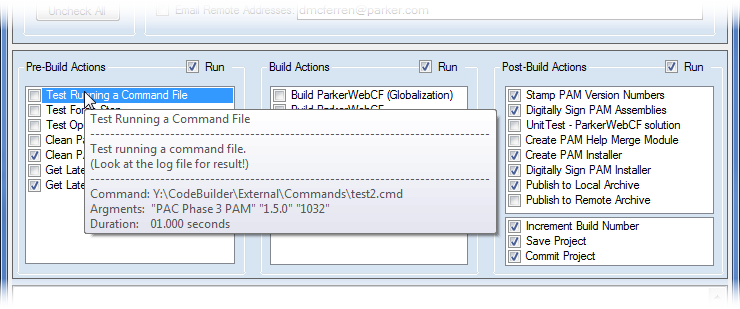 For all actions the following information is displayed in the tooltip:
- The name of the action.
- The description of the action.
- The command to be run.
- The arguments to the command to be run.
- The amount of time the action last took to run.
Some tooltips such as those available when hovering over the ‘Build’ action lists, show the ‘description’ assigned to the particular action being hovered over. Descriptions are assigned at the time the action is created, but can be modified at any time. Since all actions must have a ‘name’, when a description has not been assigned to a particular action, the tooltip content is simply the same as the ‘name’ given to the action. -
'Mouse Hover' example 3The following shows the mouse being hovered over an action - in this particular example - the Clean PAM Install Output Directory action: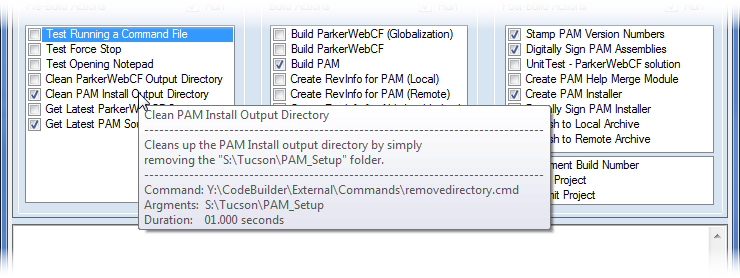 Note the information displayed this time is related to this particular action.
 -
'Check All' buttonClick the Check All button to place a checkmark into all the Action list items and the Run checkmark control at the top of each list of actions.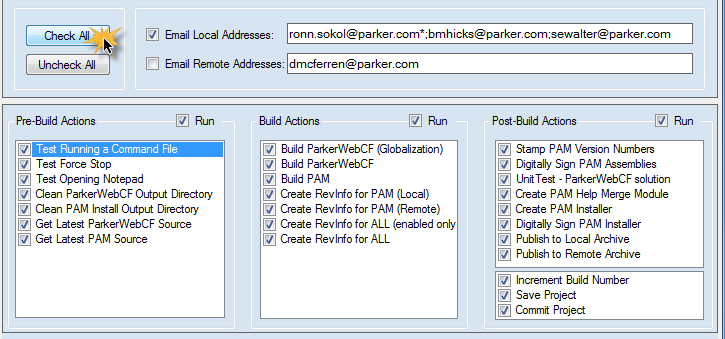
-
'Uncheck All' buttonClick the Uncheck All button to remove the checkmark from all the Action list items and the Run checkmark control at the top of each list of actions.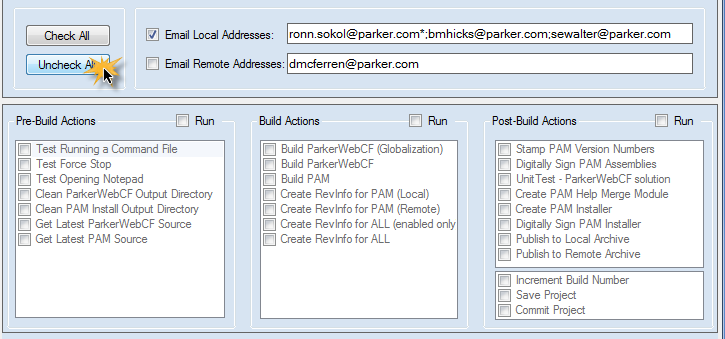
In addition to the ability to check or uncheck all the checkboxes pertaining to ‘all’ the actions lists at once by clicking either the 'Check All' or 'Uncheck All' button, you can also check all or uncheck all items in a specific actions list by right-clicking the list and choosing the corresponding menu item:
-
File | Revert menu itemSelect this menu item to revert any changes made to the project to whatever was last saved.
-
'Email Local Addresses' controlContains the list of local email addresses to send a message to when a job has successfully completed and has been published to the local archive. Email is normally sent out immediately following a successful run to the email addresses defined in two separately maintained lists (or groups of users). You can choose to send email to either one or both of the groups by using the corresponding checkboxes located to the left of each. In fact, at any time during a run, you can change these email settings before the email gets sent. Separate emails are sent out for each destination (i.e., ‘Local’ or ‘Remote’) that gets published to. Whenever publishing to a local destination, email is sent out immediately after the local destination is published to.
 -
'Email Remote Addresses' controlContains the list of remote email addresses to send a message to when a job has successfully completed and has been published to the remote archive. Because publishing to a remote location takes a significant amount of time to perform, whenever a remote destination is published to, email is not sent out to the remote location until the very end of the run.
 -
'Email Addresses' controlAlthough you can resize (stretch the window) to see more email addresses at a glance, you can also click the down arrow located to the right of the email addresses field to display the information in an easy to view list form as shown here

Append an asterisk to any email addresses that you only want to have email sent to if and when a run should fail. Email addresses are normally delimited by a semicolon, but you can also use a space.
-
'Email Message' indicating SuccessThis is an example email sent out to all users in the list of email addresses showing that the run completed successfully: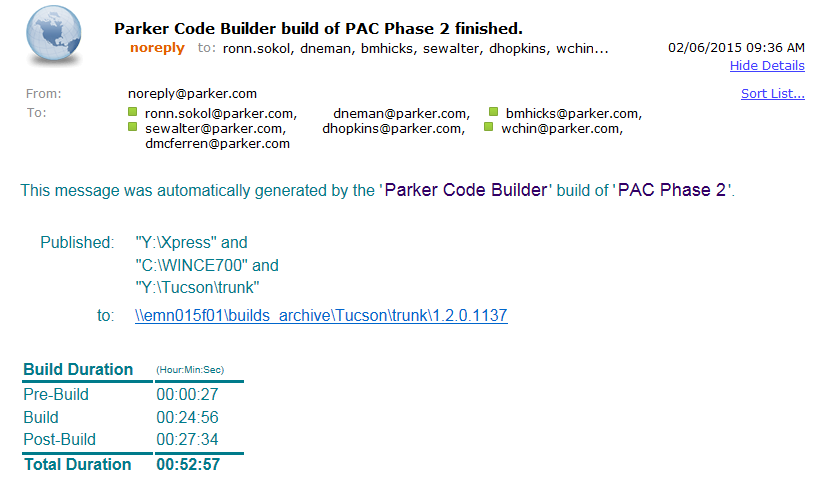 What got published to the archive and a hypertext link to the archive is included in the message.
 -
'Email Message' indicating FailureThis is an example email sent out to only users having an asterisk beside their email address showing that the run failed: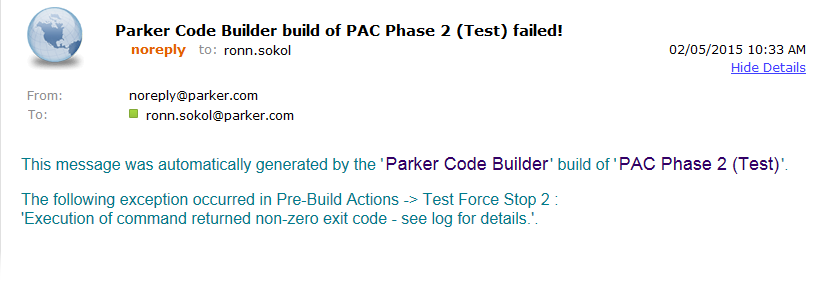 The general cause of the failure is part of the email message.
 -
'Acknowledge Exception' indicating failureWhen a run fails a red message immediately becomes visible in the middle of the main application window: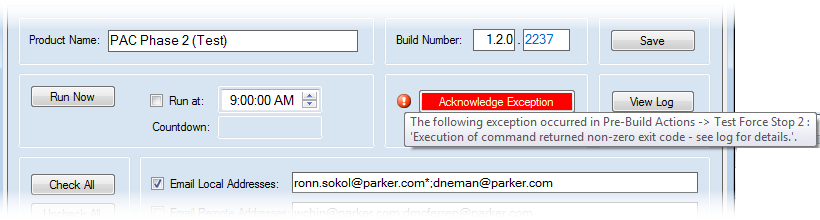
Hover the mouse over the red area to show a tooltip describing the error in general terms.
It must be acknowledged (i.e., the red rectangle clicked on) before you can proceed.
You should examine the log file for further explanation as to the cause for the error.
-
'View Log' buttonClick the 'View Log' button at any time during or after a run to open the log file containing more detailed information regarding the run.
Under the View Log button is an Append Log checkbox that when checked, causes information to be appended to the current log file during the next run instead of the log file being overwritten (which is the default).
Note that there is an item in the 'Options' dialog you can set to always override the value of this checkbox.
-
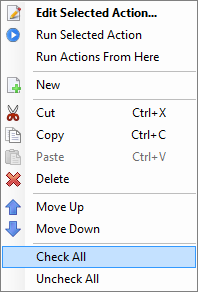
'Action' context menuThis is the Action context menu: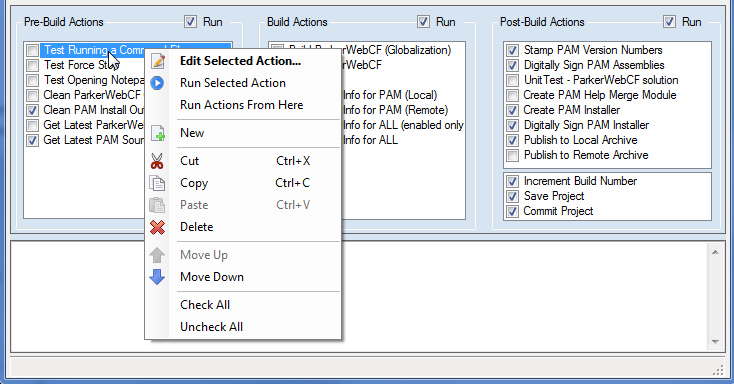
You can perform edit commands (i.e., 'Cut', 'Copy' 'Paste' and 'Delete') on individual actions the same as you edit standard text.
If you want to rearrange the order of actions in a particular action list, right-click the action to display its context menu and select either the 'Move Up' or 'Move Down' menu item.
Right-click an action in the list and select the 'Edit Selected Action...' menu item to open the 'Edit Action' dialog coinciding with the selected action or just simply double-click an action in the list.
-
'Edit Action' dialogThis shows the Edit Action dialog: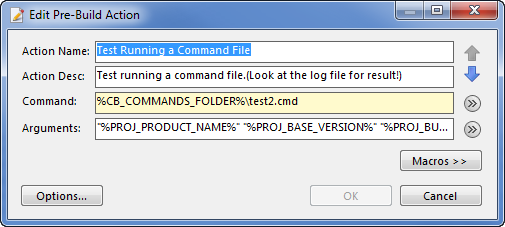
-
'Edit Action' dialog - << Macros buttonClick the Macros >> button on the 'Edit Action' dialog to expand the list of macros.
Click the << Macros button on the 'Edit Action' dialog to collapse the list of macros.
You can optionally show or hide the macros by just manually resizing the dialog.
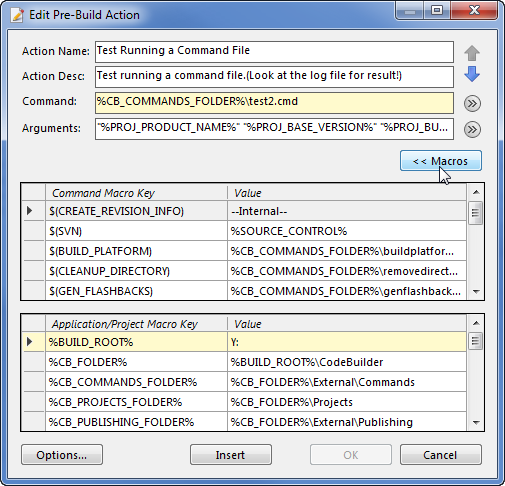
A macro is helpful for several reasons:
- Provides information (such as the build number) which would otherwise not be readily available.
- Often condenses the amount of text needing to be displayed.
- All references are automatically updated if the value corresponding to a macro changes.
Click the << Macros button to hide the macro grids.
The left column of each grid contains the name of the macro and the right column contains the value it corresponds to.
From a UI standpoint, the currently active macro field (i.e., the Command textbox or the Arguments textbox), is shown highlighted in yellow.
Similarly, the active row in the active macro grid (i.e., a row in the Command Macro grid or the Variable Macro grid), is highlighted in yellow.
Click the Insert button to copy the macro name from the highlighted row of the macro grid into the highlighted macro field’s current selection.
Alternatively you can just double-click a row in either macro grid to place the macro name into the highlighted macro field’s selection.
-
'Edit Action' dialog - Command buttonClick the Command button just to the right of the Command field and hold the mouse down to display a context menu: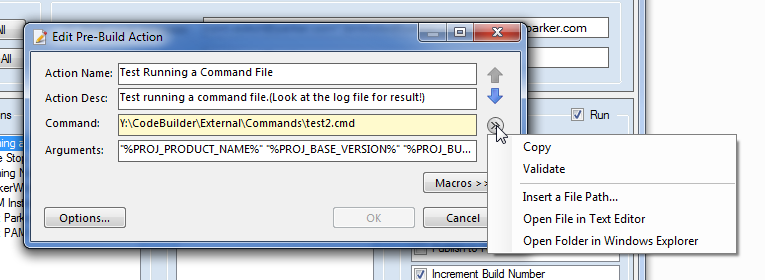
-
'Edit Action' dialog - Command button - ValidateClick the Command button and select the Validate menu item to determine whether the information entered into the Command field represents a valid 'file' or 'folder path':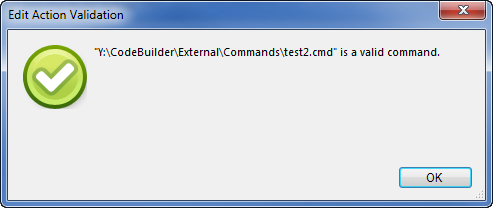
-
'Edit Action' dialog - Command button - Open File in Text EditorClick the Command button and select the Open File in Text Editor menu item to open the file specified in the Command field using the default text editor: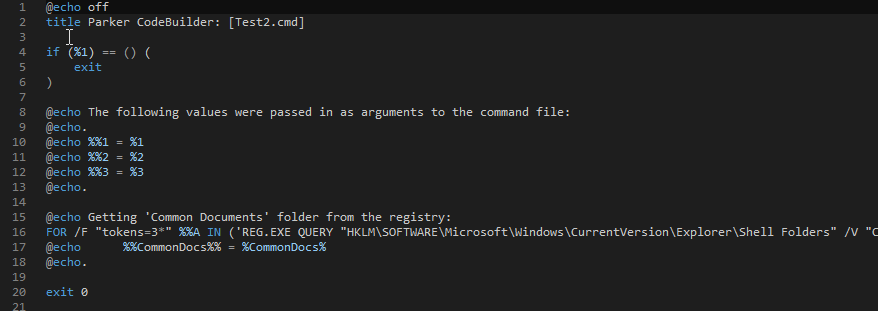
-
'Edit Action' dialog - Command button - Open Folder in Windows ExplorerClick the Command button and select the Open Folder in Windows Explorer menu item to open the folder in a new Windows Explorer window:
-
'Edit Action' dialog - Mouse HoverHover the mouse over a field in the Edit Action dialog to temporarily display a tooltip containing information relative to the field being hovered over.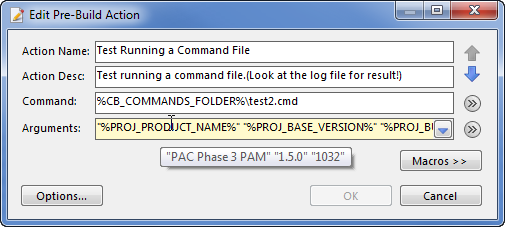
-
'Edit Action' dialog - Arguments button Insert a File Path dialogClick the Command button and select the Insert a File Path... menu item to open a new 'Select File' dialog corresponding to the currently displayed action.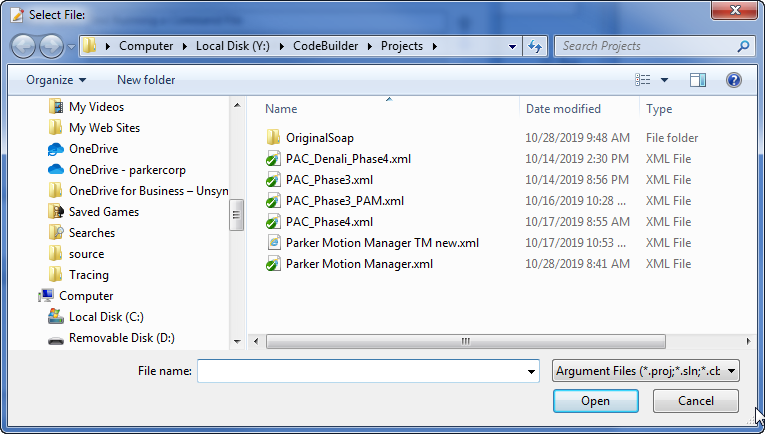
-
'Edit Action' dialog - Arguments button Insert a Folder Path menu itemClick the 'Select Folder' dialog
-
'Edit Action' dialog - Arguments button Edit File List... menu item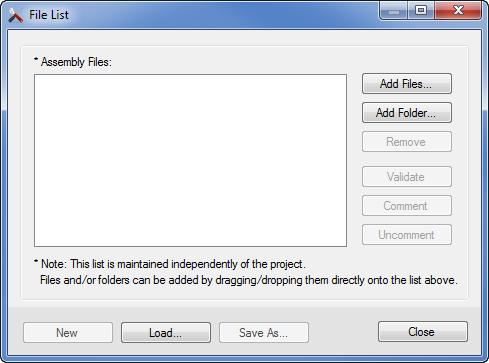
-
'Edit File List' dialog - Add Folder... button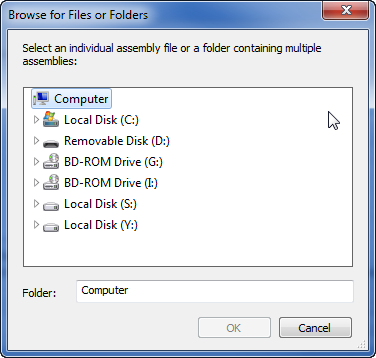
-
'Edit File List' dialog - Add Files... button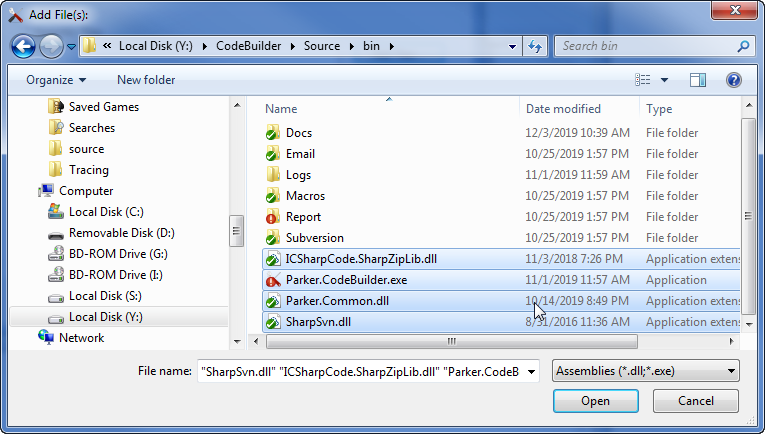
-
'Edit File List' dialog - Assembly Files listWhen you open an existing 'Edit File List' dialog you will see the list of assembly files:
-
'Edit File List' dialog - Comment buttonSelect one or more lines in the list of Assembly Files and then click the Comment button.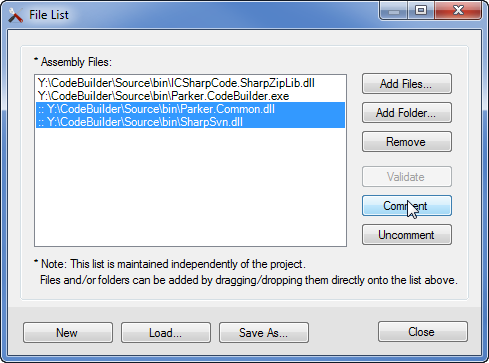
Notice that comment characters (::) are prepended to each file currently selected in the list.
This maintains the item in the list, but temporarily prevents it from being processed whenever the action that references this file is run.
Select one or more lines and then click the Uncomment button to reverse the affect of clicking the Comment button.
-
'Edit File List' dialog - Unsaved Changes confirmationThis dialog is displayed should you click the Close button in the File List dialog and there are unsaved changes.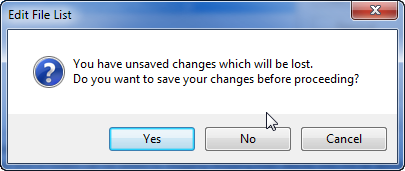
Click Yes to perform the save and close this dialog and the File List dialog.
Click No to close this dialog and the File List dialog without performing a save.
Click Cancel to close this dialog and reshow the File List dialog.
-
'Action' listbox - Run Selected ActionRight click on an the Action in the list of actions to display this menu: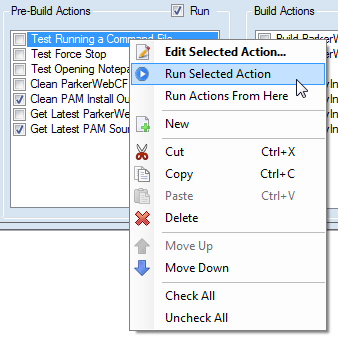 In this example we are clicking the Run Selected Action menu item.
 -
'Action' listbox - Run Selected Action - Notifier dialogA CodeBuilder notifier dialog is displayed whenever you select an action to be run which currently does not contain a checkmark.
Click the Yes button to run the action.
Click the No button to not run the action.
-
'Post-Build Actions'Post-Build Actions has three separate (non-editable) actions associated with it that are always available for all projects at all times.
These three fields are located at the bottom of the Post-Build Actions list:
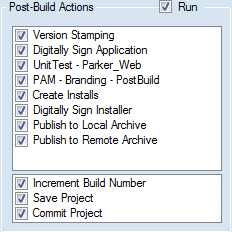
Increment Build Number when checked, automatically increments the current build number following a successful run.
Save Project when checked, will automatically save the project when the run finishes.
Commit Project when checked, will automatically commit the project to Subversion.
Placing a checkmark into the Commit Project action will automatically place a checkmark into Save Project action. Likewise, removing the checkmark from the Save Project action will automatically remove the checkmark from the Commit Project action.
-
'Main' window - Stop buttonClick the Stop button any time during a run to halt the execution of any more actions following the currently running action. The run stops only after the currently running action finishes.
-
'Main' window - Force Stop buttonClick the Force Stop button to halt a run immediately no matter what, even if in the middle of running an action.
Before this request is carried out, a dialog is displayed providing you an opportunity to change your mind:

-
'Main' window - Status Bar Indicator while runningWhile a project is being run, information is displayed in the status bar :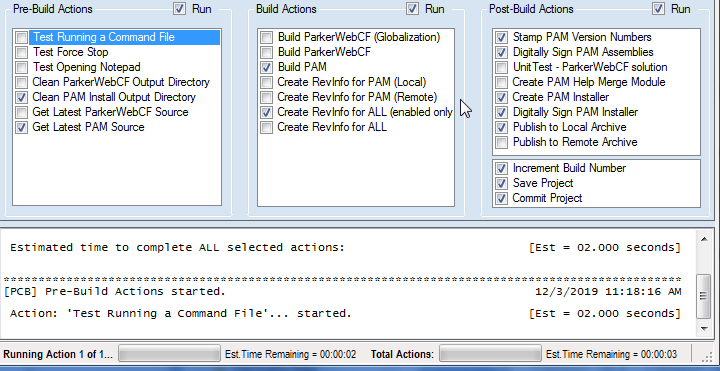
This information indicates:
- Total number of actions being run.
- Number of the current action in respect to all of the selected actions.
- Amount of time the current action consumed the last time it was run.*
- Amount of time remaining to run the current action.
- Total amount of time remaining before finishing all selected actions.*
* The amount of time is based on what the actions consumed the last time being run.
-
'Options' dialog - App Settings tabThe App Settings tab provides you with options related to the application as a whole: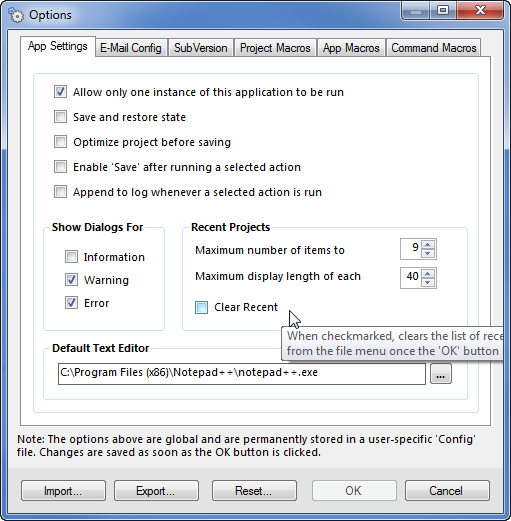
-
'Options' dialog - E-Mail Config tabThe E-Mail Config tab provides you with options related to sending email: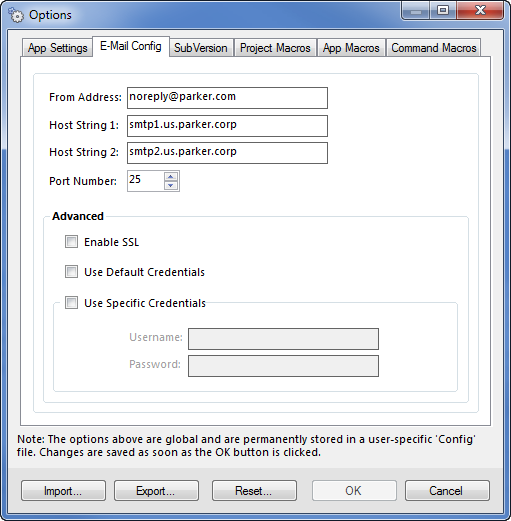
-
'Options' dialog - SubVersion tabThe SubVersion tab provides you with options related to source control: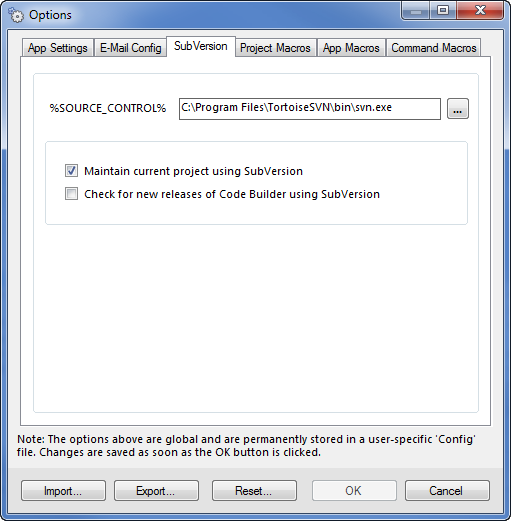
-
'Options' dialog - Project Macros tabThe Project Macros tab provides you with options related to the maintenance of Project Macros: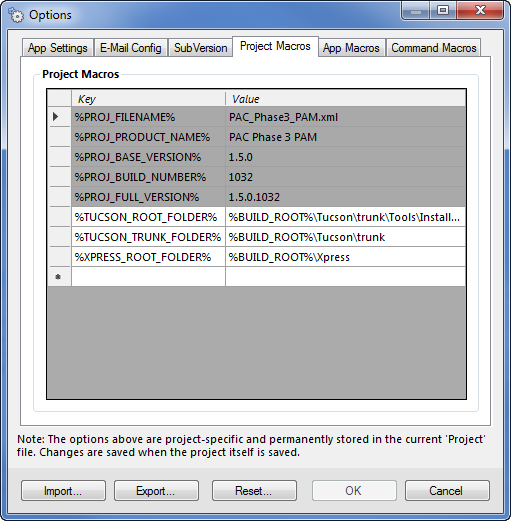
A grid containing all available Project Macros in the form of key/value pairs is displayed.
Note that the areas shown in gray are read-only.
-
'Options' dialog - App Macros tabThe App Macros tab provides you with options related to the maintenance of Application Macros: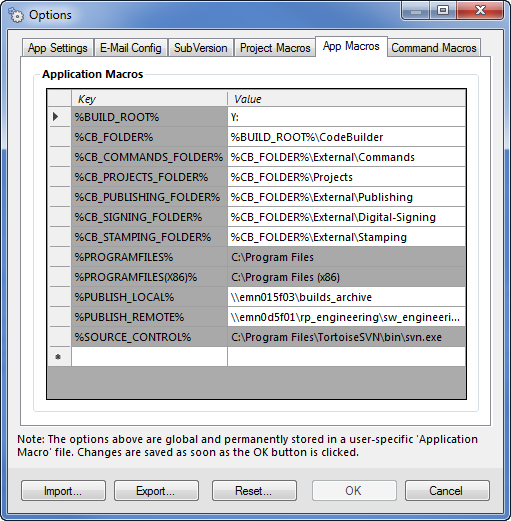
A grid containing all available Application Macros in the form of key/value pairs is displayed.
Note that the areas shown in gray are read-only.
-
'Options' dialog - Command Macros tabClick the Command Macros tab in the Options dialog to display: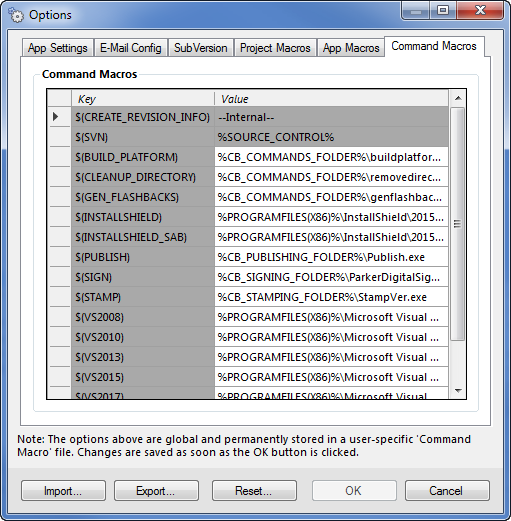
A grid containing all available Command Macros in the form of key/value pairs is displayed.
Note that the areas shown in gray are read-only.
-
'Help' menu - Check for New Version... menu itemSelect the Check for New Version... menu item in the Help menu in the main menubar to check whether there is a new version of CodeBuilder available in SubVersion: This menu item is only displayed when SubVersion is truly available and only when you have previously indicated to use SubVersion for version checking the Code Builder application using the Options dialog.
 -
'Help' menu - Check for New Version... status bar indicatorIf the version of Parker Code Builder is current, no dialog is displayed. Instead the information is temporarily displayed in the status bar indicating you are already using the most current version. If the version of Parker Code Builder is NOT current, a dialog is displayed asking you if you want to upgrade to the new version.
 -
'SVN' menu - Project Info... menu itemSelect the Project Info... menu item in the SVN menu in the main menubar: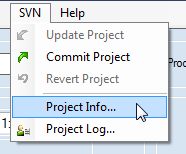
-
'SVN' menu - Project Info windowThe Project Info window is displayed: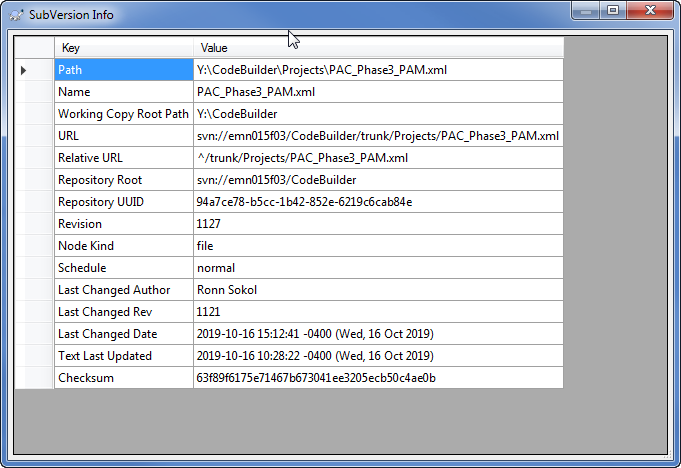
-
'SVN' menu - Project Log... menu itemSelect the Project Log... menu item in the SVN menu in the main menubar: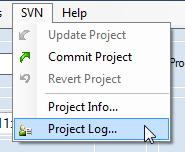
-
'SVN' menu - Project Log windowThe Project Log window is displayed: This window provides a complete history - i.e., each date and time the project was checked into SubVersion.
 -
'Help' menu - About Parker Code BuilderSelect the Help menu | About Parker Code Builder menu item to display the 'Help About Parker Code Builder' dialog: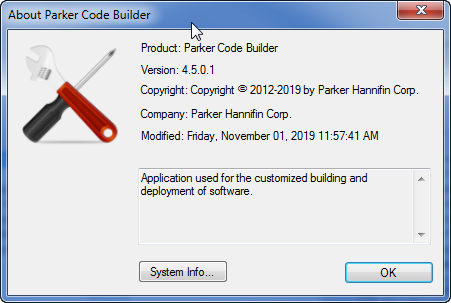
-
'Help' menu - About Parker Code Builder - System Info... buttonClick the System Info... button on the About Parker Code Builder dialog to display the 'System Info' dialog: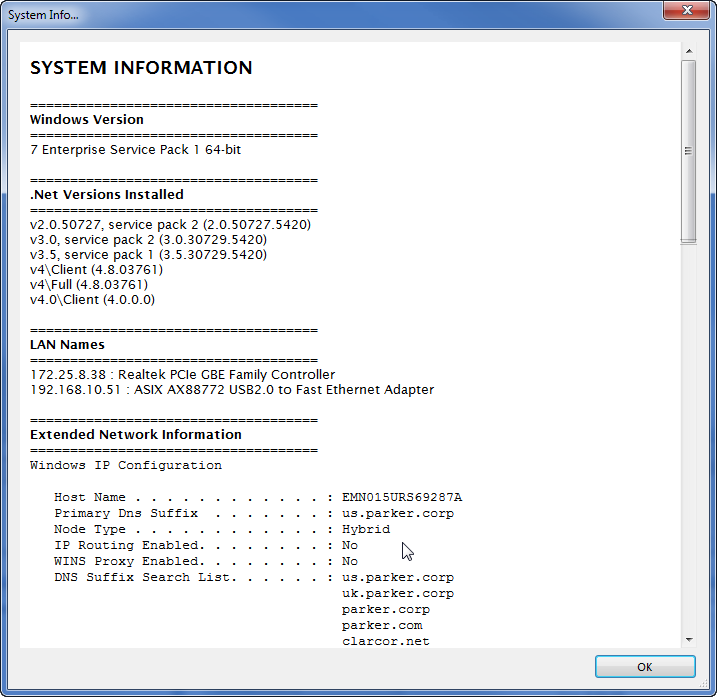 This dialog provides information about the current PC such as the version of Windows installed and all of the versions of .Net installed on the PC, among many other things.
 -
Publish To ArchiveFor publishing to an archive, there are special ‘publish files’ which contain a tab-delimited list of files to be published. These special files are designated by a ‘.cbp’ extension.
The default text editor is used by this application for editing these Publish files.
The text on each line contains two items delimited by one or more tabs. The first item defines ‘what is to be copied’ and the second item ‘the sub-folder to copy to’ at the destination.
If the second item is left blank, the file is copied to the root folder of the destination.
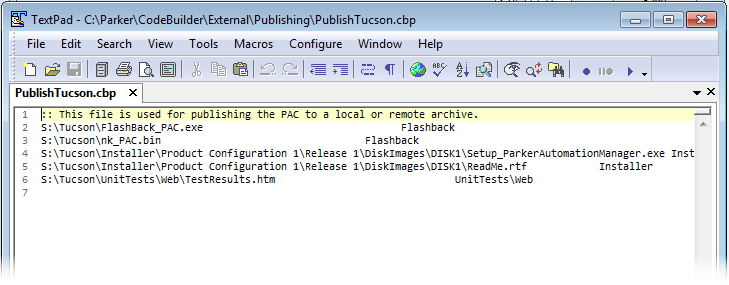 Note that you can 'comment out' (i.e., designate data inside the publish file to be ignored), by simply prefacing the line with a double colon (“::”).